The First Experience on Pointe
Bold, red, underlined words are links that you can click on to gain further information.
........
How It Should Feel
Pointe shoes will feel very different from ballet slippers or street shoes. The snug fit allows little, if any, room to wiggle the toes. They will feel very constricted at first, less so as the shoes break in. A little numbness in the toes is also normal. Dancers soon become accustomed to these discomforts, which are experienced to some degree with each new pair of shoes they wear.
At first, there is the uncomfortable sensation of feeling the end of the shank which stops in the middle of the heel of the foot. Balance is also somewhat difficult at first because the shank is narrower than the sole of the foot. Strong ankles are needed to keep the feet from rolling side to side.
Another different feeling is a lessening of depth in demi-plié. This happens because the ribbons constrict the ankle joint and the snug shoe prevents the foot from spreading out as it does in ballet slippers or barefoot.
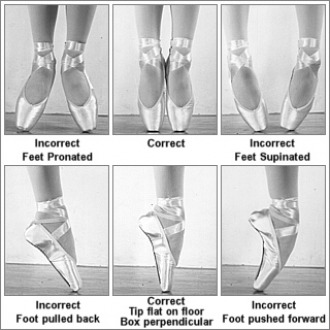
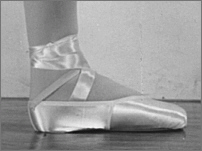
When standing on pointe, the foot should be placed so that the instep is fully stretched and the toes form a perpendicular angle with the floor. A straight line can be drawn through the center of the hip, knee, ankle and big toe joints (when viewed from the side). From the front, a straight line can be drawn through the hip, knee, and ankle joints through the box of the shoe, on or between the second and third toes. The entire flat surface of the tip of the box should touch the floor.
The dancer's weight should be lifted out of the shoes and evenly distributed throughout the body. At no time should the dancer be allowed to "sink down" into the shoe. This inhibits her dancing, creates undue stress and pain in the joints of the foot, and causes shoes to wear out faster.
For proper placement on pointe, a dancer with a high instep and/or very flexible metatarsal joints may be required to actually flex her toes a bit while still fully stretching her insteps.
........
How It Should Feel
Pointe shoes will feel very different from ballet slippers or street shoes. The snug fit allows little, if any, room to wiggle the toes. They will feel very constricted at first, less so as the shoes break in. A little numbness in the toes is also normal. Dancers soon become accustomed to these discomforts, which are experienced to some degree with each new pair of shoes they wear.
At first, there is the uncomfortable sensation of feeling the end of the shank which stops in the middle of the heel of the foot. Balance is also somewhat difficult at first because the shank is narrower than the sole of the foot. Strong ankles are needed to keep the feet from rolling side to side.
Another different feeling is a lessening of depth in demi-plié. This happens because the ribbons constrict the ankle joint and the snug shoe prevents the foot from spreading out as it does in ballet slippers or barefoot.
When standing on pointe, the foot should be placed so that the instep is fully stretched and the toes form a perpendicular angle with the floor. A straight line can be drawn through the center of the hip, knee, ankle and big toe joints (when viewed from the side). From the front, a straight line can be drawn through the hip, knee, and ankle joints through the box of the shoe, on or between the second and third toes. The entire flat surface of the tip of the box should touch the floor.
The dancer's weight should be lifted out of the shoes and evenly distributed throughout the body. At no time should the dancer be allowed to "sink down" into the shoe. This inhibits her dancing, creates undue stress and pain in the joints of the foot, and causes shoes to wear out faster.
For proper placement on pointe, a dancer with a high instep and/or very flexible metatarsal joints may be required to actually flex her toes a bit while still fully stretching her insteps.
How Long Shoe a Pointe Shoe Last?
The life of a pointe shoe can vary from one hour (for a professional dancer dancing an extremely demanding role in rehearsal or performance ) to one year (for a beginning student). The beginning student may outgrow her first pointe shoes before they wear out because the first 6-12 months of pointe work is done very slowly and carefully and does not put much strain on the pointe shoe. As the pointe technique becomes more demanding, the shoes will usually wear out before they are outgrown.
The initial wear and tear on shoes can include:
1. The satin gets dirty (it doesn't stay shiny pink forever)
2. The satin on the shoe tip tears and must be cut off (this is really an advantage since the rougher canvas underneath provides better traction that the slippery satin.
3. The canvas insole, which covers the inside shank, comes unglued and bunches up, causing discomfort (when loose, just pull it out)
4. The side seams of the shoe pull apart slightly
5. The nails in the shank loosen and fall out None of these things will prevent or hinder dancing.
A more serious concern is that the box and tip of the shoe will get progressively softer until they do not adequately support and protect the toes. While this is a natural result of perspiration dissolving the glue that makes the box stiff, the dancer can delay this softening by stuffing the boxes with tissue or newspaper each time she takes them off. This also helps the shoes retain their shape. Because pointe shoes should be allowed to dry out thoroughly between wearings, a mesh, drawstring bag which allows good air flow is ideal for carrying them.
Young pointe students should replace their shoes before they become too soft. Advanced dancers sometimes wear their shoes a few times after they are really too soft for pointe work, in order to strengthen their feet. Once the shoes have become too soft to wear on pointe, the whole inside shank and its nails can be removed (de-shanked), and the shoes can be worn in place of ballet slippers for classes or rehearsals.
SHOE SELECTION
Most of the pain associated with pointe shoes is the direct result of ill-fitting shoes. Shoes that are too long or too wide will allow the foot to slip and slide inside, causing blisters to form on the tops of the toes. Shoes that are too short or too narrow may squeeze the toes and joints together and not allow them to work properly.
Unfortunately, most salespeople in dancewear stores are not experienced ballet dancers with years of experience wearing pointe shoes. While their intentions are good, their level of expertise may be inadequate.
There are several different brands and styles of pointe shoes available in this country, varying in strength of the shank, width and shape of the box, and length of the vamp. Each teacher's preference and recommendation in shoes for the beginning pointe student should be followed.
Whenever possible, it is highly recommended that the first few pairs of pointe shoes be personally fitted in the store by the student's pointe teacher. If this is not possible to arrange, and until the student is advanced enough to fit herself, the new shoes should be taken to class and tried on for the teacher's approval before any ribbons or elastic are sewn on.
Most dance supply stores will exchange pointe shoes for a different size if they are unworn and unsewn.
Correct Fit
The student should wear tights when trying on her shoes. The correct fit is so precise that wearing socks of even a slightly different thickness than tights could result in purchasing an incorrect size.
Pointe shoes are sized differently than street shoes and each brand has its own method of sizing. A good, snug fit will feel just that -- snug. Correctly fitted pointe shoes will not slip on and off as easily as street shoes or ballet slippers. Due to the shorter wearing time, shorter life, and frequent replacement of pointe shoes, the snug fit does not endanger healthy growing young feet.
Modern pointe shoes are still individually handmade by specially trained and experienced cobblers.
There is no Right or Left shoe designation in new pointe shoes. Either shoe may be worn on either foot. Each shoe should be tried on and evaluated in the following ways:
1. No wrinkles should be visible in the box area of the shoe either while standing flat or on pointe. Their presence probable indicates that the shoe and/or box is too narrow.
2. You should not be able to slip your finger between the edge of the box and the top of the foot when the foot is flat or on pointe. If you can, the shoe is probably to wide.
3. Pointe shoes should fit like a glove on pointe. Because most feet are shorter in length when stretched (pointed) than when standing flat, a correct fitting shoe on pointe will feel very snug on flat.
To check the length, place the foot on pointe. The heel of the shoe should lie smoothly over the heel of the foot. If you can pinch any material together, the shoe is too long. Another indicator of a "too-long" shoe is the feeling the dancer may have, as she rises on pointe, that her toes are slipping down slightly into the box of the shoe. This is a sure sign that blisters will form.. There should be little or no room inside to wiggle the toes.
It may be necessary to try on a dozen or more pairs of shoes before determining which pair fits best.
CLICK HERE FOR INFORMATION ON FITTING FREED'S POINTE SHOES
Preparing New Pointe Shoes
After the first pair of pointe shoes has been selected, and only after both shoes have been tried on for the teacher's approval, it is time to sew on the ribbons and elastic. This should be done by the student, with help from an adult only when necessary. A student who is mature and responsible enough to begin pointe work must also accept the responsibility of preparing and caring for her shoes.
Sewing the Elastic
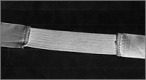
3/8" - 5/8" wide elastic. Sew to the outside of the shoe, where it will not rub the heel and cause blisters. Measure a length of elastic to fit snugly from the back of the heel, around the ankle and back to the heel again. This elastic will hold the shoe level on the foot. It should be fairly tight (but not tight enough to stop circulation). Sew the elastic with the same type of whipstitch used to secure the ribbons, starting at the top edge of the shoe, down the right side, across the bottom, taking long stitches at least ¼" into the elastic, and then up the left side of the elastic. It is not necessary to secure the elastic to the casing of the shoe. The elastic should be sewn at a slight angle at the back of the shoe. After each wearing, the dancer should check her ribbons and elastic for any needed repairs and make them before the next wearing.
Sewing the Ribbons
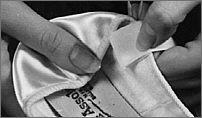
Two and one half yards of 7/8" wide pink satin/grosgrain ribbon is needed for each pair of pointe shoes. This type ribbon is shiny satin on one side and rough grosgrain on the other. The grosgrain side will be placed toward the leg to help grip the tights and hold the shoe in place.
1. Place the two ends of the ribbon together. Fold the ribbon in half. Cut into two equal length pieces.
2. Fold each piece in half and cut again. You should now have four 22½" lengths of ribbon.
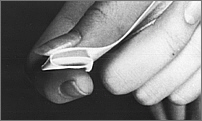
3. Next, take the pointe shoe and fold the heel forward from the end of the shank. Place the ribbon inside the shoe next to the edge of the heel and lightly mark the shoe on each side of the ribbon with a pen or pencil.
4. Take one section of ribbon. Fold under one end about 5/8" shiny sides together. Fold under again.
1. Place the two ends of the ribbon together. Fold the ribbon in half. Cut into two equal length pieces.
2. Fold each piece in half and cut again. You should now have four 22½" lengths of ribbon.
3. Next, take the pointe shoe and fold the heel forward from the end of the shank. Place the ribbon inside the shoe next to the edge of the heel and lightly mark the shoe on each side of the ribbon with a pen or pencil.
4. Take one section of ribbon. Fold under one end about 5/8" shiny sides together. Fold under again.
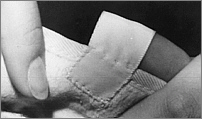
5. Place the folded end between marks on the shoe. The fold should be even with the bias tape edging of the shoe. The shiny side of the ribbon should face outward, toward the outside of the shoe. The grosgrain side faces inward.
6. With a double strand of thread, sew small whipstitches around the two sides and bottom of the ribbon. Go through all thicknesses of ribbon, but only through the white canvas shoe lining. Stitches should not go through the satin to the outside.
When sewing across the top, use a running stitch catching only a little of the bias tape casing. Be careful not to sew through the drawstring, as this will prevent proper adjustment. You'll know that you've stuck your needle into the drawstring if it becomes difficult to pull the needle through the casing.
7. Repeat Steps 3 through 6 with the other 3 lengths of ribbon.
8. To prevent raveling, run the ribbon ends very quickly through a match flame which will melt the nylon fibers. Caution: This should be done only by an adult.
Inserting Elastic in the Ribbons
Dancers with a relatively small demi-plié (which becomes even smaller with ribbons tied around the ankles) may wish to sew elastic into the ribbons. This allows the ribbons to adjust to the changing size of the ankle and allows the dancer to have a near-normal plié.
To do this, sew the ribbons on as normal. Then begin to tie the ribbons, marking each one where it touches the bank of the ankle bones. Cut each ribbon straight across, melt the end, and sew a 2-3" length of 3/4" elastic to the ribbons. You may sew by hand or on a machine. Sew the remaining ribbon pieces onto the other end of the elastic. When this has been done on all four ribbons, tie as normal and cut off the extra ribbon.
To do this, sew the ribbons on as normal. Then begin to tie the ribbons, marking each one where it touches the bank of the ankle bones. Cut each ribbon straight across, melt the end, and sew a 2-3" length of 3/4" elastic to the ribbons. You may sew by hand or on a machine. Sew the remaining ribbon pieces onto the other end of the elastic. When this has been done on all four ribbons, tie as normal and cut off the extra ribbon.
Tying the Ribbons
The ribbons must be tied correctly so that the shoe will remain correctly positioned on the foot. Slip the foot through the elastic and into the shoe. Cross the ribbons over the instep, continue wrapping them around the Achilles tendon and again across the instep. Now take the ribbon which is going around the outside of the foot and bring it across the Achilles tendon to meet the inside ribbon.
Tie a square knot at the soft part of the foot between the inside ankle bone and the Achilles tendon. Neatly fold up the excess ribbon and tuck it, from the top, under all the ribbons wrapped around the ankle.
The ribbons which wrap the ankle should lay on top of each other rather than wind up the lower leg.
Breaking in the Shoe
Pointe shoes should not be worn at home without the teacher's permission.
Brand new pointe shoes are unsuitable for wearing. Some "breaking in" must be done before the shoes can be worn comfortably. For new students, the "breaking in" should be done by or under the supervision of the teacher.
1. The box of the shoe needs to be "smashed" or flattened to help it conform to the shape of the foot. The shoe can be placed in the hinge side of a sturdy door -- between the door and its frame. The door is then gently pulled shut so as to flatten and widen the box. Another method is to lay the shoes on the floor and step on top of the box with the heel of your foot.
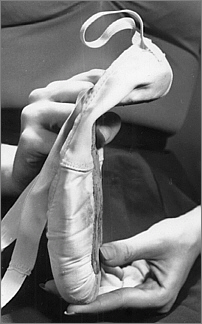
2. Bend the stiff, flat shank at the place where it will conform to the shape of your arch. This should be done at the very back of the shank -- NOT IN THE MIDDLE! To make it flexible, it is sometimes necessary to bend the shank back and forth several times until it bends easily.
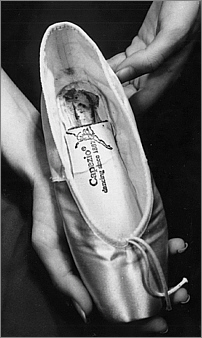
3. Try on each shoe. If it gaps around the side of the foot, adjust the drawstring for a snug fit. Be careful not to pull too tightly. Tie the strings in a square knot, cut off ends to about 1 inch, and tuck them inside.
4. Put the shoes on, tying the ribbons correctly. Walk around on as high a demi-pointe as possible. This will be difficult and painful at first. But increased flexibility in that area of the shoe will make it much more comfortable to work in.
CAUTION: This last step in breaking in the shoes is very important but should not be attempted at home without the teacher's permission.
Brand new pointe shoes are unsuitable for wearing. Some "breaking in" must be done before the shoes can be worn comfortably. For new students, the "breaking in" should be done by or under the supervision of the teacher.
1. The box of the shoe needs to be "smashed" or flattened to help it conform to the shape of the foot. The shoe can be placed in the hinge side of a sturdy door -- between the door and its frame. The door is then gently pulled shut so as to flatten and widen the box. Another method is to lay the shoes on the floor and step on top of the box with the heel of your foot.
2. Bend the stiff, flat shank at the place where it will conform to the shape of your arch. This should be done at the very back of the shank -- NOT IN THE MIDDLE! To make it flexible, it is sometimes necessary to bend the shank back and forth several times until it bends easily.
3. Try on each shoe. If it gaps around the side of the foot, adjust the drawstring for a snug fit. Be careful not to pull too tightly. Tie the strings in a square knot, cut off ends to about 1 inch, and tuck them inside.
4. Put the shoes on, tying the ribbons correctly. Walk around on as high a demi-pointe as possible. This will be difficult and painful at first. But increased flexibility in that area of the shoe will make it much more comfortable to work in.
CAUTION: This last step in breaking in the shoes is very important but should not be attempted at home without the teacher's permission.
Warming up your shoes for Pointe class
Dancing en pointe is a wonderful, exhilarating feeling. To get that feeling, you will need to warm up properly.
This article will teach you all about how to properly warm up in your pointe shoes before class.
Warm up in your flat shoes.
This article will teach you all about how to properly warm up in your pointe shoes before class.
Warm up in your flat shoes.
- Put on your pointe shoes. Make sure you have tied the ribbons securely.
- Stand in a parallel position facing the barre.
- Cross your right leg over your left in a plie. Let your platform touch the floor, and when you plie, you should arch your foot. Do the same crossing your left leg over your right.
- Stay parallel. Relax your arms, and then roll up onto pointe. Now roll back down to flat. Focus on rolling through the demi-pointe. Don't bend your legs while doing this. Repeat a few more times.
- Go into first position. With your right foot, go through your demi-pointe and put pressure on your foot in this position. Now roll all the way through to a propped foot. Push over. Roll through your demi-pointe into flat position. Repeat with your left foot, and repeat the entire exercise a few more times.
- Facing your barre, roll up onto pointe in a first position without bending your knees. Roll down. Now, plie, then releve, staying in first position.
- Do some tendus. Make sure to "massage the floor", which means you should go through your demi pointe and keep contact with the floor the entire time. Put pressure on the floor like you are giving it a massage.
- Face your barre and stand in second position. Releve and stay on pointe as you plie. Some people refer to this as "pushing over". If done properly, you will be stretching out your arch.
- Stand in second position and face your barre. Releve, and then turn a 1/4 turn so that your left hand is on the barre. You should be in a fourth position here. Plie while staying up on pointe. Your back foot's weight should be only on your big toe. You don't want the whole platform to be on the floor because then you would be sicling your foot. Your front foot's weight should also be on the big toe, but only bevel your foot as much as you can without straining. After doing this, you can go back to second positiong, turn the other way, and repeat this exericse but to the left instead of the right.
- Face the barre in fifth position. Plie, and then releve into pase. See if you can balance. Check for a straight supporting leg, strong arms, turned- out legs, and strong, turned-out feet. Close back to fifth, bringing the passe-leg back. Close with control. Repeat with the other leg.
- Face the barre. Take one large step back away from the barre. Now, stand in fifth position, facing the barre. Plie both legs, tendu your front leg, and then, keeping your extended leg straight, step up onto that leg. This is called a pique. You should be in a pase position. Take hold of the barre to steady yourself. See if you can let go and balance. As in the previous exercise, look for a straight supporting leg, strong arms, turned-out legs, and strong, turned-out feet. Close back to fifth, bring the pase-leg back. Close with control. Take a large step back and repeat with the other foot.
MODIFICATIONS FOR THE ADVANCED STUDENT
After the student has danced on pointe for several years, she may desire to make some modifications in her shoes which will make the "breaking in" process shorter and easier, and which may increase the comfort of her shoes. These modifications should, of course, be made only with the knowledge and under the supervision of the teacher.
Cutting the Shank
Feet that are not overly flexible in the ankle or instep may not be able to sufficiently "break in" the shank of the shoe, and bending the shank may not be enough to allow it to conform to the shape of the foot.
To make the shank more flexible, the inside shank may be cut off near the heel where the sole of the foot bends. Using a utility knife, cut carefully across the shank, layer by layer, until the small heel section can be removed. The nail holding this section to the shoe should also be removed., To make the edge of the shank more comfortable, bevel-cut through the thickness of the shank so that it tapers towards the heel.
To make the shank more flexible, the inside shank may be cut off near the heel where the sole of the foot bends. Using a utility knife, cut carefully across the shank, layer by layer, until the small heel section can be removed. The nail holding this section to the shoe should also be removed., To make the edge of the shank more comfortable, bevel-cut through the thickness of the shank so that it tapers towards the heel.
Shaving the Outer Shank
It is difficult to balance on shoes that have thick outer shanks. The edges of the shank may be beveled with a utility knife so that they taper to the satin. This usually makes the shoe easier to stand on. NOTE: Use extreme caution when using a sharp knife!
Getting Rid of the Noise
New shoes make a distracting noise. For performances, dancers must "beat" the noise out of pointe shoes to make them absolutely silent. This can be done by beating the pleated area against a brick wall or cement sidewalk or with a hammer. It is a long process, requiring patience, a strong wrist, and ear plugs.
Softening the Boxes
To aid in "breaking in" the box, it may be softened with rubbing alcohol (preferred because it evaporated and dries quickly) or water.
To apply, lightly soak a cotton ball in rubbing alcohol and dab across the box of the shoe at the place where it should bend on demi-pointe. Never pour the alcohol or water directly onto the shoe as that could weaken too much of the shoe and make it unwearable.
After softening the boxes in this manner, it is especially important to allow them to dry out completely before wearing. Dancers' tendency to just toss their pointe shoes in their dance bags can be fatal to damp, alcohol softened shoes crushed under a pile of warmers, leotards, and other paraphernalia.
Hardening the Too-Soft Shoe
When the box of the shoe softens, it is generally time to buy new shoes. If, for financial or availability reasons, this is impossible, the following is a temporary solution. NOTE: This will NOT return your shoes to their original hardness. You can expect only a few added wearings.
Apply commercial liquid floor wax to the tip, pleats, and box of the shoe with a old toothbrush. Apply only to the outside of the shoe, and only where the hardness is desired. Stuff the boxes with newspaper and fold the ribbons inside the shoes. Place on a baking sheet in a cold oven. Bake at 250 degrees for 3 minutes. Turn the oven off and leave the shoes inside overnight. Be sure to tell your family that your shoes are in the oven, so that they won't preheat them for breakfast.
Apply commercial liquid floor wax to the tip, pleats, and box of the shoe with a old toothbrush. Apply only to the outside of the shoe, and only where the hardness is desired. Stuff the boxes with newspaper and fold the ribbons inside the shoes. Place on a baking sheet in a cold oven. Bake at 250 degrees for 3 minutes. Turn the oven off and leave the shoes inside overnight. Be sure to tell your family that your shoes are in the oven, so that they won't preheat them for breakfast.
"Pancake-ing" the Shoes
Today, some ballet companies prefer the look of dulled, peach-colored pointe shoes to the shiny pink of brand new shoes. The line of the dancer's leg is then smooth and unbroken from tights to feet. To do this, apply a light shade of pancake make-up (i.e. Max Factor Natural No.1) to the pointe shoe and ribbons with a sponge and very little water. Allow the shoes to dry thoroughly before wearing.
Darning the Shoe
One modification, more often used in years past, is the darning of the tips of the box. Small, tightly spaced stitches were darned onto the tips to provide more traction and to preserve the satin. Because it is so time consuming, few dancers today take the time to darn their shoes. Most prefer to simply cut off the layer of satin, exposing the rougher canvas underneath.
Problems and Injuries
Uneven Toe Length
If the second toe is longer than the big toe, it may be necessary to build up the length of the big toe in order to help relieve the pressure placed on the weaker and longer second toe. This can be done by placing one or two foam rubber corn pads on the tip of the big toe, inside the tights. Another suggestion is to tear up a soft, porous sponge and place a few of the pieces in the toe of the shoe before putting it on the foot.
Blisters
Blisters occur when tender skin is rubbed back and forth against the inside of the shoe. Most blisters caused by pointe work pop open and sometimes bleed before the dancer experiences much pain. But once the raw skin is exposed, the pain of dancing with an open blister is extreme. It is better to stop dancing and tend to the blister than risk worsening or infecting the area.
If any of the dead skin remains on the open blister, cut it off with sterile scissors. Cover the blister with Merthiolate or rubbing alcohol. Both of these stings like crazy for a few seconds, but they are most effective at drying up and hardening the exposed skin.
Expose the healing blister to fresh air whenever possible.
If you must dance in pointe shoes again before the blister has healed, cut a piece of moleskin larger than the blister. Cut a hole in the middle -- a little larger than the size of the blister. Place the outside ring on the toe around the blister and secure with adhesive tape. If needed, use two layers of moleskin.
A product called Second Skin, which is a layer of gel between two very thin layers of cellophane-like film, can be placed right on the open blister. Then use the moleskin donut and tape to secure it in place.
If one toe consistently gets blisters, it is advisable to wrap the healed toe in adhesive tape before each wearing. This should prevent a new blister from forming.
Callouses
Callouses, which toughen the skin, are not necessarily attractive, but are essential to keeping the foot blister free. These usually occur on the knuckles of the toes and on the Achilles tendon where the shoe rubs the heel. The skin in these areas may redden and be tender immediately after pointe work but will harden later. Because these callouses help prevent new blisters from forming, don't remove them with a pumice stone.
Corns
Corns are the result of abnormal pressure from ill-fitting shoes and can be quite painful. Hard corns on the top of the toes may respond to commercial medications or may need to be taken care of by a doctor. Soft corns, which develop between the toes, may respond to separating the toes with cotton or a commercial toe spacer.
Ingrown Toenails
Ingrown toenails occur when the edge of the toenail grows down into the soft skin of the toe. This can best be alleviated by trimming the toenail straight across without rounding the corners. If pain occurs, soak the foot in warn water and place a thin bit of alcohol-soaked cotton under the edge of the nail. Repeat this several times daily until the nail grows out over the skin. If the area becomes infected, see a doctor immediately.
Bruised Toenails
Two painful conditions result from improper toenail length. If the toenail is too long, it will extend beyond the toe itself, and the pressure of pointe work will bruise the live cells of the nail bed causing the toenail to grow out purple. If the nail is too short, the skin at the tip of the toe will pull way from the nail, causing pain. To ensure that toenails are the proper length, cut them straight across (helping prevent ingrown toenails), so that when pressing the tip of your toe, your finger barely touches the end of the nail.
The pain of a severely bruised toenail can be relieved if doctor's care is received within 24 hours of the injury. Before the accumulation of blood in the nail bed dries, a doctor can drill a tiny hole through the nail and release the pressure. (This sounds horrible, but it really isn't. The pain of a badly bruised nail is much worse!) If a doctor cannot be seen before the blood has dried, however, the dancer will have to endure several days of pain as the nail bed heals. Once the pain is gone, it is fine to continue dancing on pointe -- even if the toenail is purple.
Sometimes only a part of the nail will grow out in a purple color. If most or all of the nail is purple, the whole nail will eventually fall off. Don't worry. This is neither painful nor prevents dancing.
Bunions
Bunions are inflamed joints of the big toe caused by undue pressure on that area. Care should be taken to see that the pointe shoes (and street shoes) are wide enough across the metatarsal joints, and that the foot is placed properly on pointe with the toes exactly perpendicular to the floor.
To help relieve the pain, a toe spacer can be worn between the big and second toes. This properly positions the big toe and prevents it from being crushed into the other toes at an angle. A toe spacer can be made out of a one-inch strip of paper towel which is folded up in a small rectangle and held together between the toes with adhesive tape.
Tendonitis
A more serious problem is Achilles tendinitis. Pain on or around the Achilles tendon is a clear signal that bad habits have developed, and the foot is not working correctly. As soon as pain in this area develops, the student should immediately notify the teacher and STOP all dancing. For three days, the dancer should completely rest, elevate, and ice the injured area. With a doctor's permission, taking aspirin, ibuprofen, or another anti-inflammatory medicine may help reduce tendon inflammation, as well as relieve the pain.
After 3 days of complete rest, the dancer should begin barre work cautiously, after first warming the area with warm water, a heating pad, or leg warmer. The leg warmer should only be worn to warm up the area. Once class begins, it should be removed so that the teacher can watch carefully for signs of improper alignment such as rolling in or "sickling" the foot.
At first, all releves, pointe work, and jumps should be avoided. Add only a few at a time and only if no pain persists.
If any pain persists or develops, the dancer needs to stop immediately and give the area more rest, elevation, and ice.
Tendinitis, if cared for immediately, usually responds to the above therapy. If allowed to persist, it can become chronic and very difficult to cure. This is not an injury to suffer through.
Strains and Sprains
Strained or sprained muscles are serious injuries. The injured area should be elevated, and an ice pack applied immediately to prevent swelling. Consult a physician (if possible, an orthopedist who specializes in sports or dance medicine) for further diagnosis and treatment.